Events Calendar
2026年5月
1
金
金
2
土
土
3
日
日
4
月
月
5
火
火
6
水
水
7
木
木
8
金
金
9
土
土
10
日
日
11
月
月
12
火
火
13
水
水
14
木
木
15
金
金
16
土
土
17
日
日
18
月
月
19
火
火
20
水
水
21
木
木
22
金
金
23
土
土
24
日
日
25
月
月
26
火
火
27
水
水
28
木
木
29
金
金
30
土
土
31
日
日
2026年6月
1
月
月
2
火
火
3
水
水
4
木
木
5
金
金
6
土
土
7
日
日
8
月
月
9
火
火
10
水
水
11
木
木
12
金
金
13
土
土
14
日
日
15
月
月
16
火
火
17
水
水
18
木
木
19
金
金
20
土
土
21
日
日
22
月
月
23
火
火
24
水
水
25
木
木
26
金
金
27
土
土
28
日
日
29
月
月
30
火
火
2026年7月
1
水
水
2
木
木
3
金
金
4
土
土
5
日
日
6
月
月
7
火
火
8
水
水
9
木
木
10
金
金
11
土
土
12
日
日
13
月
月
14
火
火
15
水
水
16
木
木
17
金
金
18
土
土
19
日
日
20
月
月
21
火
火
22
水
水
23
木
木
24
金
金
25
土
土
26
日
日
27
月
月
28
火
火
29
水
水
30
木
木
31
金
金
2026年8月
1
土
土
2
日
日
3
月
月
4
火
火
5
水
水
6
木
木
7
金
金
8
土
土
9
日
日
10
月
月
11
火
火
12
水
水
13
木
木
14
金
金
15
土
土
16
日
日
17
月
月
18
火
火
19
水
水
20
木
木
21
金
金
22
土
土
23
日
日
24
月
月
25
火
火
26
水
水
27
木
木
28
金
金
29
土
土
30
日
日
31
月
月
- ...closes at 6pm
- …Opens at 12:00
- ...Closed days
Ongoing Events
-

-
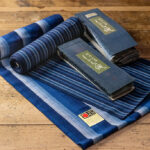
 6/5(金)〜6/11(木)
KAGAWA Shikki (Lacquerware) Traditional Craftsman Mitsuo Watanabe Exhibition
INFORMATIONAnnouncements
-
2026.04.28
-
2026.04.28
The "Traditional Crafts Aoyama Square" website has been made multilingual.
-
2026.04.03
Announcement of "Identity Forum (Future Generation Co-creation Project)"
-
2026.03.26
-
2026.02.02
Traditional CraftsLearnabout traditional crafts
Designated by each prefecture in Japan
Introducing traditional crafts.
You can search by region, industry, etc.
MOVIEvideo channel
A must-see! "Master craftsmanship" revealed in video.
EVENTExternal Event Information
Held outside the Aoyama Square store
We will introduce event information.
