TOKYO Some Komon (fine-pattern Dyeing)

The origins of komon (small-patterned kimono fabric) can be traced back to the Muromachi period, but it wasn't until the Edo period that komon dyeing became widespread.
The dyeing of the formal attire (kamishimo) worn by feudal lords from all over the country led to the formation of a production center.
Initially, komon kimonos were only worn by samurai, but in the mid-Edo period, influenced by the free and stylish sensibilities of townspeople culture, they became popular among commoners and developed into a more elaborate style. While komon kimonos were worn by both men and women during the Edo period, they became exclusively for women during the Meiji era.

  • Technology/techniques/raw materials

    Technology/techniques

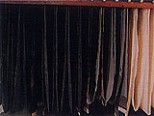
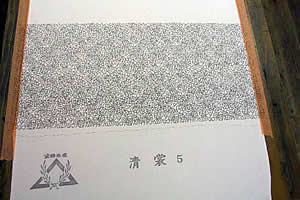
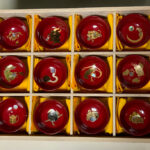
    1. The colors and patterns shall be in the style of small patterns.

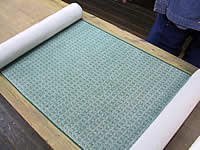
    2. The stencil shall be made by carving onto a base paper made by pasting handmade Japanese paper with persimmon tannin, or a base paper of equivalent quality.

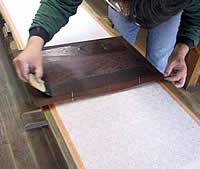
    3. The shaping process involves manually matching the patterns.

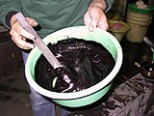
    4. The base dyeing shall be done by either brush dyeing or "shigoki" (a type of scrubbing).

    5. Nasen nori shall be made by mixing glutinous rice flour with rice bran and salt, etc.


    raw materials

    The fabric must be silk.

  • Work scene

    TOKYO Some Komon (fine-pattern Dyeing) is done entirely in one workshop, from preparing the color paste to drying and finishing. The most distinctive feature of TOKYO Some Komon (fine-pattern Dyeing) is the extremely fine detail of the patterns. On a white fabric approximately 12 meters long, stencils about 20 centimeters in size are placed with the utmost precision. If the stencil is even slightly misaligned, lines will appear in the pattern, rendering the fabric unusable. The dyer stands before the white fabric, concentrating intently to ensure that the engraver's vision is fully expressed. It is this harmony between the engraver and the dyer that creates TOKYO Some Komon (fine-pattern Dyeing).

    Step 1: Engraving the pattern

    Two to three sheets of high-quality handmade Japanese paper are glued together with persimmon tannin to create the "base paper." Then, a carver uses an awl (a carving tool with a thin, semi-circular blade), a small knife, and self-made carving tools to carve various, extremely fine patterns into it. This is mainly produced in the Shiroko region of Ise.

    画像をクリックすると動画が再生されます

    Step 2: Adjusting the colored paste

    Colored paste is crucial as it significantly impacts the final dyed result. Colored paste consists of a base color and a contrasting color. First, glutinous rice flour, rice bran, and a small amount of salt are mixed and steamed. Then, the dye is added to the well-kneaded base paste, carefully prepared through test dyeing. The dye itself is a mixture of several chemical dyes. While color creation has become more digitized recently, the final color adjustment still requires the years of experience and intuition of a skilled craftsman.

    Step 3: Shaping

    First, a white fabric is stretched tautly over a single fir board that is about 7 meters long. A stencil is then placed on top, and a resist paste is applied using a spatula made of cypress called a "koma." This way, the paste is applied only to the cut-out parts of the stencil, and the parts without paste are dyed. Applying the paste to a long piece of fabric (about 12 meters) without any misalignment or unevenness is the most difficult part of TOKYO Some Komon (fine-pattern Dyeing). The stencils are aligned by matching the small dots called "okuriboshi" at the edges of the stencils. The stencils are made of washi paper, so they dry out very easily, and if they lose even a little moisture, they must be dipped in water. This is because if the stencil is dry, the size of the dots may be misaligned.

    画像をクリックすると動画が再生されます

    Step 4: Drying on a board

    Once the shaping is complete, leave the fabric attached to the board and let the glue dry. For multi-colored patterns, repeat the shaping process. This will result in a more vivid pattern.

    Step 5: Dyeing the base color (shigoki)

    Once the paste has dried, the fabric is removed from the board, and a base color paste containing the dye is applied evenly over the entire surface using a large spatula, and the fabric is dyed. This process is called "shigoki".

    Step 6: Steaming

    Before the base color paste dries, place the fabric in a steaming box and steam it at 90-100 degrees Celsius for 15-30 minutes. This is to fix the dye contained in the paste to the fabric, and the steaming process requires skill.

    Step 7: Rinse with water

    After steaming, the fabric is thoroughly rinsed to remove any starch or excess dye. The dyeing industry flourished along the Kanda River because there was an abundance of water ideal for washing.

    Step 8: Drying and finishing

    The fabric is washed, dried, then its width is adjusted using a hot water pressing method, and after careful inspection, it is dyed.

  • Close-up

    TOKYO Some Komon (fine-pattern Dyeing) are renowned throughout Japan for their intricate patterns. The fine designs, so subtle they appear almost solid from a distance, and the surprisingly understated colors, reveal the spirit of the Edo people. I had the opportunity to witness the passionate collaboration between an Ise engraver and an Edo craftsman, and the heartfelt creation of these works.

    The sophistication of Edoites revealed through their colors

    In Shinjuku, Tokyo, a district renowned as one of Japan's most glamorous areas, the dyeing industry, a core element of Edo-era traditional crafts, remains deeply rooted. TOKYO Some Komon (fine-pattern Dyeing) of dyed fabric, continues its relentless practice in a corner of this bustling metropolis. This dyed fabric, cherished by samurai and commoners alike since the Edo period as "Edo Komon," saw its production center shift to the Kanda River area, known for its clean water, after the Meiji Restoration.
    TOKYO Some Komon (fine-pattern Dyeing) is characterized by its subdued colors and delicate patterns. The artisans affectionately call it Edo komon (hereinafter referred to as Edo komon). You might think that these colors would be flashy, given that they were worn by the flamboyant Edoites, but quite the opposite is true; the tones are surprisingly subdued, giving them a deep, calm, and sophisticated feel. "This kind of color scheme probably stems from the Edo period's policy that commoners shouldn't be extravagant," says Mr. Saotome, a dyer and head of the komon association. "Edoites were plain on the outside but flashy underneath, for example, the lining of their haori jackets would be incredibly flashy. I think it's because their sense of style is hidden that the inherent explosive energy of the Edoites comes out." The spirit of keeping what is visible to everyone plain, while having one's own thoroughly refined world where no one can see. This is the true "chic" of Edo.
    "For the colors, we use slightly unconventional shades. Even with red, we add a touch of rust to make it less striking. Adjusting the colors is difficult. Edo komon is dyed using only a single base color, so it's very challenging."

    The biggest challenge in Edo Komon (a type of kimono fabric) is "pattern application."

    And when it comes to Edo Komon, the name refers to its extremely fine patterns, or "komon." At Kobayashi Sen-gei, we were shown the process of precisely dyeing every single tiny dot, about 1 millimeter in size. The stencils for Edo Komon are made in Shirako, Ise. The carvers engrave incredibly fine, continuous patterns, and it is the job of Edo dyers to express these patterns on the white fabric. After stretching the white fabric onto a long, narrow board, called "jibari," the next step is "katatsuke." The dyers carefully examine the entire fabric and determine the correct position. "The first stencil is incredibly important, and whether the stencil can be properly applied across one bolt (about 12 meters) depends on how this first stencil is placed," says dyer Yoshikazu Kobayashi. Once the stencil is in place, resist paste is applied to a cypress brush called a "koma," and the brush is slid evenly from side to side across the stencil to apply the paste. Once this is finished and the pattern is taken, tiny dots of a small pattern in a soft color clearly emerge on the silk, which was previously pure white.

    Even a single strand of hair's width of error can ruin it.

    From the second time onward, you use a tiny dot about 1 millimeter in size at the edge of the pattern called a "sending star" as a guide. As long as the sending star is aligned correctly, the seams between the patterns will be virtually invisible to anyone. However, the finer the pattern, the more difficult it becomes to perfectly match the tiny dots on the pattern with the sending stars on the fabric. "The simple patterns called the three main Edo komon patterns—sharkskin, ceremonial, and continuous—are the most difficult. If you're off by even a hair's width, the patterns overlap and a line appears on the fabric. These repeating patterns are a real pain. When you're doing it all day, your eyes get tired and it becomes difficult to see the tiny dots. In the end, it all comes down to how well your body remembers. It's a matter of intuition."

    The art of dyeing lies in how to express the artist's intentions.

    The dyer creates the stencil while constantly interacting with it. The stencil embodies all of the engraver's thoughts and feelings. Whether it will be released to the world or remain unused depends on the dyer's hands. "That's why engravers choose dyers who can properly express the thoughts they've carved. And dyers, in turn, choose engravers. 'I've carved something this thin, can you really dye it properly?' 'No, no, I'll dye it exactly as you want,' and that's how they push each other to improve." Edo komon is created by pouring all of one's feelings into the process. With the pride of an Edoite, the dyer continues to challenge themselves to create even finer designs.

    The intricate patterns, the more painstaking the dyeing process, can appear almost solid from a distance. But conversely, the closer you get to the wearer, the more you begin to understand the meaning behind each individual pattern. It's not about showing off to others, but about enjoying the ultimate world together with yourself and those who truly appreciate it. The Edo-era elegance hidden in every detail, the joy of wearing a kimono that can only be truly appreciated by wearing it—we urge you to try it on and experience it for yourself.


overview

Craft item name TOKYO Some Komon (fine-pattern Dyeing)
Reading Tokyo Somekomon
Classification of crafts Dyed products
Main Products Kimono fabric, haori
Main manufacturing area Chiyoda Ward, Shinjuku Ward, Setagaya Ward, Toshima Ward, Nerima Ward, and others
Designated date June 2, 1976

contact address

■ Production area association

Tokyo dyeing industry cooperative association
169-0051
3-20-12 Nishi-Waseda, Shinjuku-ku, Tokyo
TEL: 03-3208-1521
FAX: 03-3208-1523

http://www.tokyo-senshoku.com/

■ Visits to production areas from overseas
image
TOKYO Some Komon (fine-pattern Dyeing)- A Visit to the Production Area

Features

The stencils used for Komon dyeing are ISE Katagami (Paper Stencils), hand-carved by skilled artisans. TOKYO Some Komon (fine-pattern Dyeing) is created using techniques cultivated over a long tradition, and is characterized by its subtle geometric patterns and the sophisticated and dignified feel it possesses even in a single color.

How to make it

High-quality handmade Japanese paper is laminated with persimmon tannin to create a "base paper," and patterns are carved into it using an awl, small knife, etc., to make a stencil. White fabric is stretched onto a long board, the stencil is placed on top, and a resist paste is applied on top with a spatula. The fabric is removed from the board, and a paste with the base color is applied with a large spatula to dye it the base color. To fix the dye in the paste to the fabric, it is steamed before the base color paste dries. The fabric is then thoroughly washed with water to remove the paste and excess dye.

Please see here for information on traditional craftspeople.

Japanese traditional craftsman
top