RYUKYU Bingata (Dyeing)

Okinawa Prefecture

The origins of RYUKYU Bingata (Dyeing) can be traced back to the mid-15th century.
RYUKYU Bingata (Dyeing) was produced under the generous protection of the royal government, and historical records from the early 19th century indicate that Ryukyu bingata was referred to as "Oriental floral cloth" and was a renowned trade item in the Fujian market.
Although it suffered devastating damage during World War II, efforts have been made to promote Bingata since the war, through the formation of the Bingata Preservation Society and the Okinawa Bingata Traditional Techniques Preservation Society, and its designation as a "Traditional Craft" by the government in 1984.

  • Technology/techniques/raw materials

    Technology/techniques

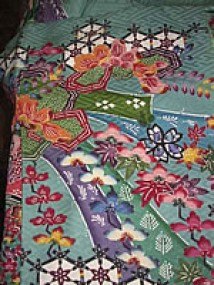
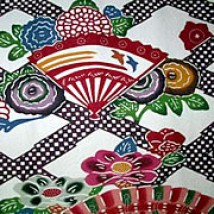
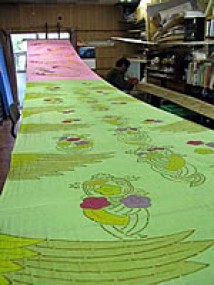
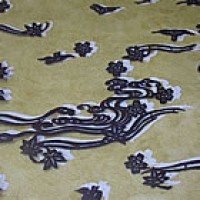
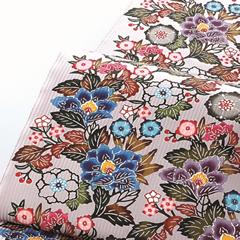
    1. The design shall be based on the Bingata pattern.

    2. The carving is done by attaching the underdrawing to a base paper made by pasting handmade Japanese paper with persimmon tannin, or a similar base paper, and then carving it using the "thrust carving" technique.

    3. The shaping process involves manually matching the patterns.

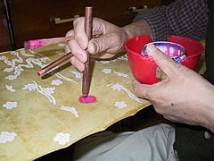
    4. For "tube pulling," use a cloth glue bag.

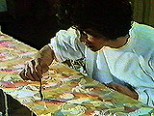
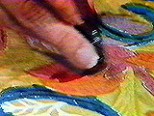
    5. For "color application," "inking," "shading," background dyeing, and background pattern dyeing, use a brush or paintbrush.

    6. The colors used for "color accents" and "shading" should be pigments.

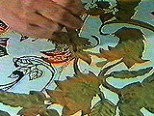
    7. Dye resistance shall be achieved by stenciling, "tube drawing," or "paste resist."

    8. The dye-resistant paste shall be made by mixing glutinous rice flour with rice bran and salt, etc.

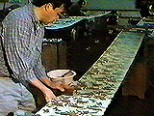
    9. For indigo dyeing using the indigo stencil, Ryukyu indigo should be used.


    raw materials

    The fabric must be silk, linen, banana fiber, or cotton.

  • Work scene

    RYUKYU Bingata (Dyeing) is broadly divided into two types: bingata, which uses multiple colors, and aigata, which uses only indigo dye. Each type has two techniques: katazome, which uses stencils, and tsutsubiki, which draws patterns by hand. The techniques are used differently depending on the purpose, such as for kimono fabric, obi sashes, and furoshiki wrapping cloths. Every step of the process, from carving intricate stencils to applying pigment to each individual pattern, requires concentration and meticulous attention. The patterned areas are dyed first, and then the background is dyed.

    Step 1: Mold carving

    There are two types of stencils: white stencils and dyed stencils. You can either draw the pattern directly onto the stencil paper or attach a preliminary drawing made on thin paper. Begin carving from the finer details. Hold the knife with the tip pointing forward and cut vertically from above. This is called thrust carving. Curves can be freely expressed, and the lines of the pattern will have a gentle and warm feel. The carved stencil is then stretched over the surface.

    Step 2: Shaping

    Place the stencil on the fabric and apply the resist paste evenly with a spatula. The paste adheres to the cut-out parts of the stencil, imprinting the pattern onto the fabric. The paste is made by boiling glutinous rice and rice bran powder and adding water.

    画像をクリックすると動画が再生されます

    Step 3: Pulling the cylinder

    This technique involves drawing patterns by hand without using stencils. A resist paste is placed in a cotton tube and squeezed out, tracing the drawn design onto the fabric. The result is a dynamic and unique look, distinct from traditional stencil dyeing. It's used for larger items like furoshiki (wrapping cloths) and bags.

    Step 4: Adding color (color scheme)

    The pattern is painted with color using a brush. The colors are made by mixing pigment with soybean juice (gojiru). The colors are applied in order from warm colors to cool colors.

    Step 5: Imprinting (double rubbing)

    Since the pigment doesn't adhere easily, apply it again with a brush and rub it in thoroughly. After applying with the brush, use a scrubbing brush. A woman's hair is used for the scrubbing brush.

    Process 6: Shading

    This is a unique technique RYUKYU Bingata (Dyeing). Darker colors are added to the patterns to create a gradient. The colors are applied in a circular motion along the edges of the petals, along the veins of the leaves, or partially along the pattern to create a blurred effect. After this, the garment is steamed to fix the color. Finally, it is washed with water.

    画像をクリックすると動画が再生されます

    Step 7: Paste application

    Before dyeing the background, a resist paste is applied over the pattern.

    Step 8: Dyeing the base

    Indigo dyeing involves dipping the fabric in an indigo vat, while background dyeing is done by applying the dye with a brush. A wide brush is used.

    Step 9: Steaming

    Steam for about an hour to allow the color to set.

    Step 10: Rinse with water

    Wash off any excess dye, pigment, or resist paste from the fabric. Let it dry, and it's finished.


  • Close-up

    Vibrant colors that rival even the southern sun

    In Okinawa, a region renowned for its dyeing and weaving, there is only one type of dyeing technique RYUKYU Bingata (Dyeing). Originally worn by women of the royal and samurai classes as formal attire, its vibrant, tropical colors and gentle patterns harmonize beautifully, attracting many women.


    Bingata furisode kimonos are the object of admiration.

    Pale green and pink fabric stretched from one end of the workshop to the other was adorned with images of trumpet lilies and bougainvillea flowers. The rustling sound of brushes rubbing against the fabric echoed through the room. Sato Minoru of the Futenma Bingata Workshop, along with his wife Masako and daughter Mayumi, were adding color to a specially ordered costume.
    Minoru has been working with RYUKYU Bingata (Dyeing) for 27 years and is a highly skilled traditional craftswoman. She is enthusiastic about trying new patterns and continues to create beautiful works one after another.
    "The appeal is being able to do every step myself. I can do it all by myself from start to finish. It's fun to pull out the image that comes to mind, dye it, and bring it to life."
    Five years ago, when her daughter Mayumi celebrated her coming-of-age ceremony, the family spent two weeks making her furisode (long-sleeved kimono) and obi (sash). The gorgeous bingata furisode was the envy of many in Okinawa, and its splendor delighted the eyes of many.

    The gorgeous bingata pattern is perfect for a furisode kimono.

    Your mood and physical condition on that day are reflected in the color you choose.

    What makes Bingata so striking are its vibrant colors, such as red, yellow, navy blue, and green. These colors are suited to the local climate and look stunning in the bright southern light. The base fabric is dyed with dyes, and the patterns are colored with pigments. Mr. Minoru showed me how he mixes the pigments. Nine different pigments are mixed into a paste with soybean juice called gojiru, and then combined to create the colors. It's a delicate process where even a slight difference can result in a completely different color.
    "The color changes depending on whether I'm feeling fulfilled or not."
    The state of mind and body is directly reflected in the artwork. This is both the frightening and fascinating aspect of handcrafted work. Nine to eighteen colors are used in a single piece. Starting with light shades of red, the artist gradually moves to darker colors. A rubbing technique is used to ensure the applied colors adhere firmly. This is a unique process of bingata. Another layer of color is applied, and then a brush made from a woman's hair is used to rub and even out the color.
    "Rubbing the fabric smooths out the edges of the glue, creating softer lines. The thickness of the pattern, the thickness of the glue—all these factors work together to create the softness of the bingata pattern."

    • Red, yellow, blue, green, and purple are the basic colors of Bingata.

    • Carefully apply the pigment using a hair brush.

    Classical literature can be passed down to the next generation.

    While diligently working on her creations, she also makes steady efforts to make bingata more widely known, such as by planning exhibitions that allow people to easily experience it. Although it is often thought of as an expensive kimono, she says, "The colors and patterns are classic and not influenced by trends. Because it doesn't go out of style, it can be passed down to the next generation. When you think about it that way, I don't think it's expensive at all."
    I don't blindly follow trends. Not following trends also requires effort. And I never forget to think of new patterns and color combinations, or propose new ways to enjoy things.
    "When there are multiple colors, the eye is drawn to the person wearing the kimono rather than the kimono itself. The person wearing it stands out. I want people to wear it freely, without being bound by age or etiquette. It doesn't have to be a kimono; it could also be used as an evening dress. I would be happy if it were used with care."
    As Mr. Minoru spoke, his eyes seemed to be firmly focused on the future of RYUKYU Bingata (Dyeing), even as he steadily progressed through the arduous process.

    The workshop is filled with fabrics currently being made.

    Craftsman Profile

    Minoru Sato

    Born in 1948.
    Joined the Futenma Bingata Workshop in 1973. Certified Traditional Craftsman. Chairman of RYUKYU Bingata (Dyeing) Business Cooperative Association.

    Minoru Sato works silently on fabric in his workshop.

    Anecdotes

    Relief carving creates soft, expressive lines.

    RYUKYU Bingata (Dyeing) has several unique techniques, but "tsukibori" (thrusting carving) is one of the most representative. Bingata uses a stencil, and the way the knife is used when carving the stencil is distinctive. Normally, the knife is slid towards the user to cut the paper, which results in sharp lines. In contrast, with tsukibori, the knife is placed from above and cut by bringing it down vertically.
    "It's a difficult carving technique, but once you get used to it, you can carve curves freely. The lines become plump and soft, giving it the unique charm of bingata," says Sato.
    Since this is a crucial step that greatly affects the final product, we take great care in our tools. I make the small knives myself. I sandwich the blade between pieces of bamboo and secure it with thread. I then use a grinder to shape the tip of the blade into a curve. I put a lot of thought into making them easy for each individual to use.
    The comforting warmth of RYUKYU Bingata (Dyeing) is born from a long process, but the secret lies in these unseen details as well.

    • Using brushes of various thicknesses for application.


overview

Craft item name RYUKYU Bingata (Dyeing)
Reading Ryukyu Bingata
Classification of crafts Dyed products
Main Products Kimono fabric, obi (sash), decorative cloth
Main manufacturing area Naha City, Ginowan City, Urasoe City, Itoman City, Tomigusuku City
Designated date May 31, 1984

contact address

■ Production area association

RYUKYU Bingata (Dyeing) Business Cooperative
〒900-0016
1-11-12 Maejima, Naha City, Okinawa Prefecture
Telephone Building, 1st Floor
TEL: 098-862-5594
FAX: 098-862-5594

http://www.ryukyu-bingata.com/

Features

This is the only dyed textile in Okinawa that incorporates Chinese stencil dyeing techniques and KYO Yuzen (Dyeing) methods. Cotton, silk, and banana fiber cloths are hand-dyed using pigments and plant dyes. There are two main styles: the vibrantly colored "Bingata" and the "Eshigata," which uses Ryukyu indigo dyeing. Each possesses a mystical charm unique to the tropics.

How to make it

The dyeing techniques are divided into "katazuke" (stencil dyeing) and "tsutsubiki" (tube drawing), where a design is drawn directly onto the fabric without using a stencil, paste is applied over the design using the tip of a paste bag, and then coloring is added. There are also two color schemes: "bingata" and "aigata". The stencils are made by placing rucoju under a base paper made by pasting handmade Japanese paper with persimmon tannin, and then carving the design in relief with a small knife. During dyeing, the patterned areas are colored, and then a shading technique called kumadori is applied on top to create a three-dimensional effect.

top